Master Bedroom Re-do

Remember back here when I gave you a peek of the inspiration for our master bedroom? I finally painted it. The walls had been sporting the I'm-trying-to-pick-a-paint-dalmatian-look since, oh, Thanksgiving-ish? Or is it Christmas-ish? It's been a while.

I finally decided on Partridge Gray by Glidden and Better Homes and Gardens. It took me a week or so to paint it since I was the only one painting. Don't get me wrong, Hubby totally would have helped if I had asked, but I absolutely adore painting. He doesn't. And I rather enjoyed my quiet evenings painting this room.


I've scoured my computer and, unfortunately, I cannot find the 'before' pictures of our room. I must have accidentally deleted them off my camera before I uploaded them. And I am so happy with our room now that it makes me quite sad that I don't have any pictures of it from before. It's quite the transformation.


This was the wall color. It was the same color that is currently in the guest room. Not bad, but not us. And there was absolutely nothing on the walls except a few cube shelves in one corner.


This picture is from our previous apartment, just to show you what our bedding looked like. The brown would have worked, but the background is more cream than white so the bedding looked dingy and blended in with the yellow walls. But I do love that print(I'm sure I'll think of something to do with it.)


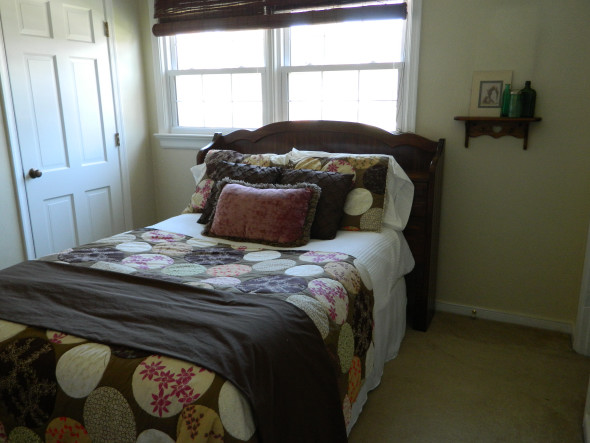
The shams on the bed are my shortened king-size pillows. The blue pillows were downstairs on our couch but I think they like it here better. The king-sized blanket is folded in between two flat sheets at the moment until I can make a new duvet cover out of them. Wow, and I just realized that everything in this photo is from Target, minus the little things on the nightstands. The nightstands, lamp bases and shades, sheets, gray duvet set, and the blue pillows are all from Target.

I have a serious problem with that place, people.

And I also have a problem with ironing. Moving on...


Down came the sliding closet doors and up went the IKEA curtains. Before we redid this room, our bed was under the big window there, wedged in between the wall and the bathroom door. The room feels much bigger now that the bed is against the long wall instead of the short wall.


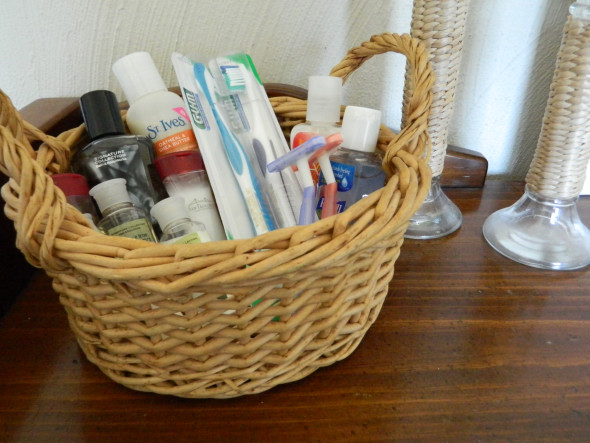
Our nightstands were becoming a haven for a ridiculous amount of books so I stuck two old baskets in each nightstand to hold them all.


This is the side of the room that needs more work. The shutters are a future diy project that will hang on the wall. Isn't my dresser pretty?


You've already seen the framed jewelry hanging on the wall. On the other side of the bed, I framed scrapbook paper in frames from the Dollar Tree. I love how the gray print echoes the design on the dresser.


I want to point out my floor mirror. I've been wanting one but they are super expensive! I picked that up at the thrift store for $10. It ain't fancy and it needs something. Paint or stain? I was thinking paint but looking at it right now, I'm thinking about a nice dark walnut stain.

Ignore the broken IKEA chair. Which by the way, is now fixed thanks to hubby!


The next thing on our list for this room is getting the curtains up. I do have curtains, but I forgot some of the hardware when I went to IKEA so they are not up yet. Sad day.

I love our new room! It is relaxing, romantic, and completely us.


Inspired Fridays

It's Friday! And there was much rejoicing to be had everywhere! Hopefully we'll get the garden together this weekend. I know, I've been saying that for three weeks now. One can only hope.


This is so great! Everything Centsational Girl does is great. I've especially liked her Solutions for Renters series because we're renters(duh!). I've really been at a loss with our bathroom because it has "issues". It really needs some work and whatever I do has to go with our old blue tile but now I'm a thinkin' that I know pretty much what I want to do! Target here I come! Once my budget recovers from IKEA.


This is gorgeous. Love it! Makes me want to go find some agate!

free-plans-upholstered-storage-bench-tutorial


I love this project!

How to Make Your Photos Pin-Worthy   rainonatinroof.com


So thankful I came across this post! I've been wondering how this was done. Can you tell I barely know anything about computers?


Happy weekend!

{Small} Guest Room Updates

I've made a few updates to our guest room since my guest room redo. Just little things, but little things can make such a huge difference!


Here is what it looked liked after the quick redo. I had a folded flat sheet at the end of the bed to add some more layers to the room. But at the end of the day, it was obviously still just a sheet.

Inspired Fridays


I hope you all have had a good week and are looking forward to the weekend. Personally, it's been a good week for me, but oh my heart goes out to Boston and Texas and the people across the world who were affected. I can't even imagine. 

My master bedroom is finally finished, and I have a busy weekend with friends and family ahead of me. And it just so happens to be GORGEOUS outside! I am loving this weather. At least for the two weeks it feels like this before Virginia hops on into summer.  Hopefully, the garden will be up and running soon!

Jute & Sisal Wrapped Drum Shade at theDIYvillage.com


DIY Framed Jewelry

I'm starting off by apologizing for the horrid lighting in these pictures. Sometimes night time is the only time I have to get anything done. Little man did not want to nap yesterday and so I was working at night. Ah, mommy life.

Sometimes I can't believe I'm married and the mommy of a toddler.  I really don't feel old enough. Wasn't I just in high school? Today we sat and watched Curious George together. We may or may not have made monkey noises while watching. Little man is very good at the monkey noises.


Now, to this little project. It really doesn't take long at all to put these together.


I started with this inspiration picture from Maple and Magnolia.  Lovely, right? And the perfect way for me to display the jewelry I had that was special to me but didn't wear.

Here's what I used to make my version:

-four 4x6 frames from the Dollar Tree
-one roll of duct tape from the Dollar Tree
-the remnants of the $5 dropcloth that I used in my guest room redo
-my jewelry: 2 vintage pins, a pair of vintage shoe clips, and a pair of clip-on earrings


First, I laid the glass from the frame on the dropcloth and cut about an inch or two around it.


Then I centered the pin on the material. For the earrings and shoe clips, I marked where I wanted them to be, then snipped a small hole with scissors, and just clipped them on.


I wrapped the material around the glass and then taped it in place, like a present. I laid the whole thing in the frame while I was wrapping it because it made it easier to make sure the jewelry was centered in the frame and to pull the material tight.


And there you have it.


 From the top: a vintage pin that adorned one of the bridesmaid's bouquets at my wedding, my wedding earrings(clip-ons and not too comfy so I haven't worn them since), a vintage pin given to me by my Nana( I believe it belonged to her mother, my great-grandmother), and the vintage shoe clips I wore on my wedding day.


They were all important to me but not being worn. Now I have a beautiful way to display them everyday!


I've linked this post up to Liz Marie Blog,  Love Grows Wild, House of Hepworths, and An Alli Event

How To Shorten A King Size Pillow

This was my project for the weekend. As you know, I'm redoing our master bedroom and our current chocolate brown and cream duvet set just didn't work with the gray. But we have a queen size bed and we have a king size duvet set. Because I like to make sure I have plenty of covers on the sides.


I wasn't a fan of having king size pillow shams though. When I found this gray print queen duvet set at Target, I snatched it up even though I didn't know where it would go. It's not every day you find $70 dollar duvet sets marked down to $20. Once I decided on our room, all the sudden I needed queen size pillows  to go in the new shams.

Inspired Fridays

It's Friday! This week has flown by for me. I've also been crazy busy so that's probably why. I know my posts haven't had a lot of substance and fun DIY stuff lately. I'm hoping to change that next week.

This week has been the week of painting our bedroom. The paint is done and the furniture is rearranged but I  still have to work on the finishing touches. More painting and a bit of sewing thrown in for good measure so I should have way more to talk about in the next few weeks!

Anyway, it's time for some fun links!

The Naked Living Room

I have lamps in my living room now!

Seriously, we've been married a few years now, lived in two different places, and we just got lamps for our living room. We have been living with one solitary floor lamp to illuminate our main living space for over three years. I was so used to it, I didn't realize how naked our living room was until I put the new lamps in their new place.


The Best Crockpot Refried Beans

Wednesday night we had tacos and burritos for dinner. In the past I have used canned refried beans but since we've been trying to eat greener, cheaper, and healthier, I decided to go the homemade route. And let me tell you, these were the best refried beans I have EVER eaten.

I've been hesitant to try homemade beans because it seemed there was a lot of work involved in it. And I just didn't remember how good they were. I'm pretty sure it's been years since I've tasted them. Unless a Mexican restaurant counts. But I'm sure they aren't this healthy either so maybe they don't count.

I found this recipe for crock pot refried beans at Pennies And Pancakes. She has it figured that this recipe comes out to $0.19 per cup. And this recipe makes about 16 cups. I like that deal!

I did not soak my beans before cooking them but I plan to next time. You could also cook this on the stove all day instead.


Ingredients:
2 lbs pinto beans
1 large onion, chopped
4 Tbsp. jarred minced garlic
Up to 2 1/2 Tbsp salt(use more or less depending on your taste. I used the full amount but next time I'll cut it down to 2 Tbsp)
1 tsp black pepper
2 tsp cumin
10 cups hot water


Directions:
Rinse the beans in a colander. Pick out any bad beans.

Combine all the ingredients in the crockpot. Remove any floating beans. Cover, and cook on HIGH for 4 hours and on LOW for 2 hours.

Uncover, and, if necessary, remove extra liquid. Leave enough liquid to reach the desired consistency when the beans are mashed.

Mash beans with a potato masher to desired consistency. 

Serve warm. Store in air-tight containers in the refrigerator and use within 2 weeks, or freeze in ziplock bags for later use.


And there you have it. Amazing refried beans. Easy peasy! I didn't think to take a picture of the finished product so if you want a peek at it, you'll have to head over to Pennies And Pancakes.

Inspired Fridays

It's Friday again! Time for some awesome inspiration!

Bathed in Style


I love this little bathroom. I love the painted blue brick. And the black vanity. So vintage-y!
How to make a luxury bed

Last time I was in a hotel, I was looking to see how they did it. Apparently I wasn't the only one. I'm thinking about this one since I'm in the midst of redoing our master bedroom. Weighing cost and such like.

Joy In The Little Things

Today has been good.

Even though my house is disorganized.


Even though I have several projects around the house I'm working on at once.

Two Hour Guest Room Redo

A few weeks ago, I shared that I am a procrastinator trying to reform. At least when it comes to my house. I had been motivated to do something, even if it wasn't perfect.

I mentioned in passing that I had worked on my guest room but I realized last week that I hadn't done a post on it yet.


Here is our rather lackluster guestroom. The walls are the same yellow that is in the master bedroom and the bedding is from my old bedroom. It doesn't really fit with the vision I have for the house but it's what I got at the moment. We store stuff in the closet and, because it's not a room we live in, I haven't done much with it.


Here it is just a couple hours later.


I just shopped my house, put together some "art," hung a picture, made the bed a little differently and tada!

Oh, and that big canvas? Just a $1 foam board from the Dollar Tree and a $5 dropcloth from Lowe's. It definitely needs something else though since it blends in with the walls. I'll probably add some color and contrast later with some of the paint samples I already have lying around here.


The little framed plant art is made with an eco-friendly laundry detergent bag that I had kept for just such a project. I bought the tray at Bed, Bath & Beyond. It's quite banged up so it was marked down to $5. It has a mat to frame photos on the bottom but I just cut a piece of wrapping paper to fit.


And yes, those are two round placemats taped up on the wall with masking tape.


And a basket of little extra toiletries for guests.


It isn't all my style, and it's not the color direction I want to go in for our house, but I think it looks a whole lot better. It's a lot more welcoming for sure. And just because it looks like this now, it doesn't mean that this is how it has to stay. I hope that is a lesson I'm learning.

Just don't peek into the hallway right now, Okay? All that stuff had to go somewhere...