Nursery Prep Work

You know when you have that room that you keep meaning to get to but somehow never do? Behold our former junk room! Which is now on it's way to becoming the new nursery. Took me long enough.

It was also one of those rooms that turns out to need more prep work than you anticipated.

I may have mentioned before that all the trim upstairs had a peeling paint problem because several layers of latex paint had been painted over oil-based paint. This room was the worst so far.

The first few pictures are from my phone. Because at 6 months pregnant, I saw no reason to make a trip down the stairs when I had my trusty smart phone with me. Although the extra exercise would have been worth it, I'm sure.


This closet door was the worst. I tried to peel off as much as I could, thinking that it would stop and I could sand the edges and just prime over it. Nope. It just kept going. And it was everywhere.

The window sill, the built-ins, the baseboards, the doors. Ugh.


My sister kinda got into the paint demolition. We couldn't get it all off so what was left was sanded and primed. 

Finally, we got to the priming step. Which I kinda skipped out on since I wanted to cover everything the right way with oil-based primer. Oil-based is nasty, fumey stuff that will singe the hairs in your nose. No painting for me. Though it didn't really matter because from that one room upstairs the fumes spread through the whole house, top to bottom.

Thank you, kind friends and family, for sacrificing your nose hairs.


The built-ins have this weird laminate thing on top of the desk area. WEIRD. It needs to be painted. I brought out the electrical sander and sanded that down with some 100 grit sandpaper. Hopefully, it's roughed up the surface enough that the two coats each of oil-based primer, paint, and some polyacrylic, will hold up to the kids.


Two coats of primer was necessary for the raw wood inside the shelves. The wood was also full of knots, so before priming, I filled as many of the cracks and small holes as I could with spackle. Should I have used wood filler instead? Probably.


Oh, and we painted the ceiling too. And by "we" I mean my aforementioned kind friends and family members.

It is so great to have all the prep FINISHED! I had originally planned to have the entire nursery finished by now. My goal is by Christmas. That will give Little Man two months to get used to the new room and toddler bed. I hope.

You can checkout the before for this room here and here.

Time for the paint!


I may be linking up here.

Our Living Room And My Goals

I am ashamed that I have not shown as much as my house as I probably should have by now. The reason being that it is always a mess. Especially now with switching bedrooms around and painting. Actually, come to think of it, you have seen a good part of this house.

I've done posts on the guest room, the current nursery, the kitchen, the future nursery, the upstairs bathroom, and my favorite, the master bedroom. All but the master bedroom are works in progress. I am just redoing everything slowly because of the whole lack of money trees around here.

It's the downstairs you haven't seen. Except the kitchen of course. And a small glimpse of the living room and office/library in this post. I suppose I need to face the reality of what the downstairs is right now instead of magically hoping it gets better.

Before living room

This is sort of how our living room started out. When we moved in, it was a large white room. This was in the middle of putting the gray-brown on the wall. It's hard to tell with the lighting going on in here, but the wall behind the couch is white.


This is an old shot of the other side of the room. And how this room normally looks on any given day.


Then we graduated to this. Please ignore my threadbare red chair. It was free from some friends who were moving and it totally clashes in this room. It's on my to-do list. Which we'll get to in a bit.

Fall living room and mantel

This is where we are right now. I've moved furniture around a few times and I'm still not exactly sure of the best layout. I've thought of moving the piano from the office into this room, but it wouldn't really work since this is the hangout room when everyone is over. Comfy, movable seating is a big necessity here.

Wicker chairs

I've thought of moving the armoire to the opposite corner to reduce glare from the window but I think that would throw the balance of the room off since the doorway into the office is on that wall too. I'd have to move the couch asymmetrical to the window

Neutral Couch Orange Pillows

I have a list of what I would like to do in here. Most of it is looking long term because of budget. And what is feasible for me to accomplish at the moment.

I've realized that I have to set goals so I know what I'm aiming for. That way, the budget is satisfied and everything works together. It's easy to lose sight of what style you are wanting when the redecorating stretches out over a few years.

Here's the quick rundown:


  1. A rug. It would totally help give this huge, long room some definition. I think the furniture just feels like it's floating. It needs to be grounded.
  2. Repaint. I know we just painted it last year, but I'm already tired of the odd gray-brown. I want something lighter. Maybe all out white? Hubby isn't quite ready for this project yet.
  3. Do SOMETHING with that huge space on the wall opposite the couch! I'm fresh out of ideas at the moment.
  4. Paint the old end table underneath that huge space on the wall.
  5. Finish painting the trim. It's only half done.
  6. Replace the leather storage ottoman with a round coffee table. I think it would be a better scale for the room and keeping it round will soften all the right angles in this room.
  7. Make that crazy white slipcover for that red chair!
  8. More pillows!
I'd love to hear your ideas too!

Ceiling Fans And The People That Hate Them

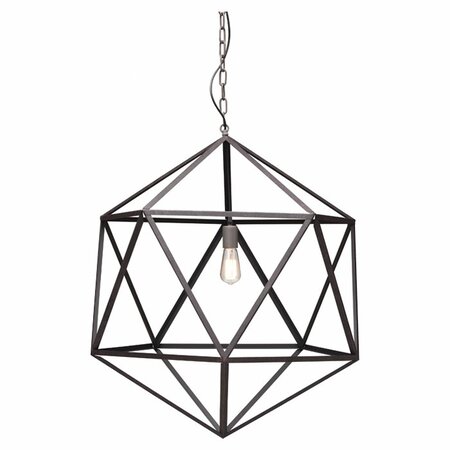
Ceiling fans. The one item every designer removed from every room ever on Trading Spaces. They just don't seem to add anything to a space. Not like a very cool light fixture.

You know what ceiling fans add to a room? Me neither. When it comes to ceiling fans...


I'm not a fan{ba dum dum.}


Hubby on the other hand, completely disagrees. The ceiling fan is his friend. Though if I had to sleep with the weird inner heater that all males seem to come with, it might be my friend too. But I'm the one who's always cold. Even when I'm pregnant.

I figure cooling is what the A/C is for, right? And therein lies the rub. Our A/C has gone out a few times this year for various reasons and we live in the South. The only thing that got us through was the ceiling fan in each room. I begrudgingly admit that.

So I guess they have their uses. I just can't bring myself to be giddy about their looks like I can about a great light fixture...


Solaris Chandelier

Like this one.


Large Altoona Pendant

Or this one.

So pretty.

My dream of pretty light fixtures in every bedroom is definitely a no-go, but I can be grateful for all the times we were not dying from the heat when our air went out. Aaannnd they give me a chance to practice my thriftiness and ceiling fan spray painting skills. Which stink if they are anything like my regular spray painting skills.

 Skills | Napoleon Dynamite

What are your views on ceiling fans versus light fixtures? Are fans just a nice but unnecessary eyesore? Most importantly, do you have skills?


Fall Pillows

Oh yay for finally getting another post up! The weather and Little Man have been conspiring to make sure I get no blogging done for the last week and a half. Short naps and rain do a wonderful job at that.

Life. It happens.

Since I decided to jump into the whole seasonal decor thing, I decided that I needed fall pillows. All my pillows were squashed and dilapidated. I needed to get rid of most of them and hubby thinks I have too many anyway so it all worked out. Except that now I was lacking inserts.

I found this brilliant tip from Mandi at Vintage Revivals: Go clearance shopping or thrifting and buy cheap pillows with feather inserts. Squishy high quality feeling pillow on the cheap. So I went to the thrift store.

I found two 20" feather pillows at a couple different thrift stores along with an orange print curtain from Target. You can still get them there by the way if you're looking for curtains. I spent more than I should have for the one curtain than I should have at a thrift store($9.00) but it was totally me, pretty, and cheaper than buying it at Target.


I sewed two envelope pillow covers using this method that Mandi shares here. I just adjusted the measurements for my pillows, adding an inch all the way around for my 20" vs her 19". Super easy once I got the hang of it.


And now two orange fall pillows grace my couch. Easy peasy. And cheap.


More fall inspiration:


I may be linking up to these link parties...

An Ode to Stripes and Polka Dots


Oh stripes! How do I love thee? 
The way your lines catch my eye, the way your colors contrast!
Behold the elegant tiny stripes! 
So classy and simple, timeless-
just like red lipstick.
Behold the bold and fun loving stripes! 
They call the observer to boldly go where no man has gone before.

Oh polka dots! You amaze me! 
Little round shapes that make such a big statement.
Tiny pinpoints, so sophisticated, so mesmerizing!
Large and rotund,
reminding me of pies and cookies!

Oh wonderful designs, so aesthetically pleasing, 
you soothe my senses and light up my life!

All the colors of the rainbow in such perfect harmony-
All of the brown stripes, so warm and comforting, 
the color of coffee and chocolate
Blending with green, the color of trees and of Kermit the Frog!

All the pink polka dots, so merry and sweet, 
dance along with the polka dots of purple,
Each color rejoicing as they lift my mood.
This is my ode to polka dots,
to stripes of red and blue, to all the colors of the rainbow,
And to all their enigmatic hues!


This was the result of one of my free-writing exercises in school. Why? Because I'm a weirdy. And, apparently, know nothing about actual poetry.

My First Fall Mantel!

A couple weeks ago, I put together a roundup of some of my favorite fall mantels. Mine wasn't quite done yet. I've sort of had it up for the whole month of September but there were those last little touches that I wanted done. I'm also super indecisive so even deciding what to do was hard for me. But I think I may have finally settled, which is good seeing as it's October already!

With my mantel, I was stuck working with what I already had. I did splurge on a few things, but only a few. I've been dying for a mirror over our fireplace but haven't settled on one yet. The one I used I already had and it's a bit small. Our mantel is just so long and narrow, I never know what to do with it.

Anyway, the big splurge for my mantel was the pumpkins. I got them at Michael's and used a 40% off one item coupon. I bought 5 pumpkins in various sizes and a few other craft items and only spent a little over $26! So I guess even my splurge wasn't too splurgey.

I forgot to take a picture before I got started. The small ones were gold metallic and the bigger ones were orange with a gold metallic-y sheen before I sprayed them all with my favorite spray paint...


No payment or sponsorship, I just love this paint!

But nothing ever seems to go as planned for me. It's usually my fault I know. Like cracking spray paint. That one is totally me. As many times as I remind myself to step back and apply thin coats, I never seem to manage it.

So after sanding them A WHOLE HEAPING LOT and after several more coats of paint, my pumpkins are finally ready for their debut. Mostly. There may have been a few spots that I was in too big a rush to get looking perfect. Oh well, if they're up on the mantel, no one will see, right?


My fall mantel out started with this. I had been given these orange pumpkins and I tried to use them, but the darker orange just didn't jive with our dark-ish brown-gray walls. I thought of painting those pumpkins, but they are made with something nice and heavy and would probably cost a fair amount of money to buy somewhere. I just decided to keep them orange and pack them up for later.

I apologize for my grainy photos. The weather has been bad this week so there is no good lighting to be had. I'll try to get up some better ones when the rain clears.


After playing around with it for a while, this is the final arrangement. I wanted lots of natural texture and contrast against the darker walls. The white pumpkins and mirror pop against the dark gray-brown. I love the texture of the burlap and jute wrapped letter. And the pine needles add a bit of nature.

Those pine needles were a last minute thing. It has been crazy rainy here the last few days and it's supposed to keep raining the rest of the week. I just reached out the back door today and scooped up a handful of wet needles. I laid them out on a towel and patted them a bit to try and dry them faster. I'm a crazy person.


After our yard sale last weekend, we loaded everything up to take to a thrift store. I saved the chalkboard at the last minute. I'm so glad I did!


I'm sure I'll get better at this whole mantel thing as time goes on, but for now, I like it. My mantel is just so weird! What would you do with a super long, narrow mantel? I don't want to spread stuff all the way across it, but I'm having a hard time getting the correct scale for the fireplace when I just stick to the middle. Thoughts?


Check out some more posts for fall inspiration:

Cheap DIY Fall Pumpkins And Vignette


Fall Pillows


I may be linking up to some of these link parties...

10 Tips For Your Next Yard Sale


As many of you know, we did a big yard sale this weekend. It went pretty well, although there were a few snags here and there. We definitely learned some things for next time. And yes, even though getting ready for a yard sale is not so fun, there will be many more in the future.

I actually enjoyed the actual sale. It was kinda fun to watch people come and find things they liked amongst the piles. Things that were not so fun: hot sun and constantly running after toddlers.

If you are thinking of doing a yard sale, there are definitely some things you should consider doing. I've come up with a list of things that worked for us and things we'll make sure to do different next time.

1. Consider starting your sale on Friday.

I was super surprised by how many people came out on Friday, even early in the morning before we had everything out! We had more sales and made more money on Friday than on Saturday{partly because of the story under #5}.You'll probably get a lot of retired folks and stay-at-home moms whose kids are in school.

2. Price as much as you can in advance.

I didn't start until a couple days before. I should have started the week before. Less stress.

3. Remember: the weather is not your friend.

I had this great thought that having a sale in October meant we might get cool fall weather. Nope. I should know better after living in the South my entire life. It. was. hot. Be prepared. Drink lots of water. And that leads into my next tip...

4. Wear sunscreen.

It's October and I have my first sunburn of the year. Just wear sunscreen. Also consider grabbing sunglasses and a big floppy hat. And one of those fans that spray water.

5. Put an ad on Craigslist.

This is big. The super yard sale people use it to plan their route for the crack of dawn Saturday morning. This is where we made a big mistake. I DID put an ad up but you have to renew them every 48 hours. I didn't renew it until I figured out that our sale wasn't showing up on my Craigslist connected yard sale app Saturday morning. Even when I did renew it, it didn't show up. My sister had to make her own account and put up a new ad. Then it took an hour to show up on the app. By this time it was 9:00 and we had missed the early yard sale folks. 

6. Organize items by category.

Instead of throwing everything together randomly on tables, separate items into categories. Put the clothes together, the books, the seasonal decorations, the kitchen items, etc. I know I get overwhelmed looking at a big unorganized mess. Keep a thrift store in mind and how it is organized. If someone if looking for a specific item, they will have a better idea of where to look first.


7. Presentation.

Don't try to make it look like Pottery Barn here, but do think about how you can best display items to attract attention. For example, my sister turned a leftover decoration from her wedding, pink fabric framed in a green frame, to display our jewelry. We didn't have much jewelry and it wasn't super nice, but it got the most attention from people. 


8. Play music.

It makes it more fun to listen to fun music when you're just sitting watching a money box. And music makes people happy. We had some fun moments with customers because there was music playing. Plus, you won't have that really quiet time watching someone walk around your sale. Awkward...

9. Don't make clothes the bulk of your yard sale.

Apparently, people do not like to buy clothes at yard sales. Even if you have Hollister jeans and Banana Republic sweaters, no one wants them. Why? Maybe it's hard to buy someone else's clothes when they're sitting in front of you. I don't understand it. To me it's just like a thrift store and you can find some good stuff sometimes. I don't get it, but that's how it works.

10. Be willing to haggle.

I'm not a fan, but lots of people are. In my opinion, it's better to make a little money instead of none. Within reason, of course. I had a big heavy TV that I marked for $8 and I sold it for $5. To me it was worth it. If I'd stuck by my $8, I doubt it would have sold and then I would have had no money instead of an extra $5 I didn't have before!

Decide on the lowest acceptable price for your most important items beforehand. Even if no one is willing to take them for that particular price at a yard sale, there's always Craigslist. 


I've been speaking of doing a Great Purge for some time and I finally have a ton of stuff cleared out! It feels so good to finally get rid of so much stuff. There were some things I couldn't quite work up the courage to get rid of yet. I'm hoping in another year, I'll finally be able to part with them.

So there ya go! What do you think of my list? Are there any other tips you would like to add?


I may be linking up here...


Yard Sale Update


This right here is where I was yesterday. I have a rather large yard sale going on this weekend. It's been fun so far although it's amazing the people that try to pay a penny for a ton of stuff. I exaggerate a bit, but still. 

I'm about to head out and set up for today and I wanted to shoot out a little update on what I'm up to. It's been going well so far, sunburn and all, but I'm nervous about the yard sale craziness that is about to descend upon us this morning. And there are several yard sales in our area so everyone will be here. 

Hope everyone has a great Saturday!

September Review

So, I know I promised my fall mantel today. It has been postponed because of technical difficulties{basically, I stink at using spray paint}. Next week it will be up for sure! Now on to the September Review!

Here are some of last month's posts:

Family picture Independence Hall PA


Best Spaghetti Sauce


Fall pumpkins and vignette


Master bedroom makeover source list


Life is Good


10 Gorgeous Fall Mantels


orange fall pillows


I am looking forward to October! I think I may give myself a challenge for the month: to only do projects that don't involve me buying anything to finish. Hubby's job is caught up in all this government shut down mess so for now I really have to watch our budget! Good thing I already bought all that paint for the nursery!